| LEARN COMPOSITE STEP BY STEP | |
|
STEP NO. 11
: BENDING MOMENT, SHEAR FORCE DIAGRAM LOAD DISPLAY AND FILES OPTION |
|
 |
|
 |
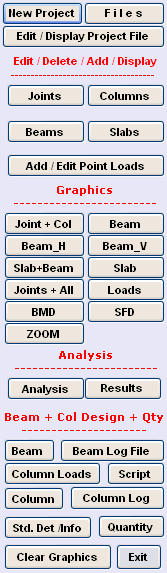
When Program starts, the Menu above is
displayed. Under the Graphics Heading
following options are displayed. ● Joint + Col ● Beam ● Beam_H (Only Horizontal Beam # will be Displayed). ● Beam_V (Only Vertical Beam # will be Displayed). ● Slab + Beam (Beams, Slabs & Columns are displayed). ● Slab (Only Slabs & Columns are displayed). ● Joints + ALL (For Display of Joints, Columns, Beams & Slabs) ● Loads (Display of Slab, Point Loads & Reactions from Secondary Beams, to be used after Analysis, and Design options have been successfully Run). ● BMD (Display of Bending Moment Diagram, to be used after Analysis, Design and Quantity options have been successfully Run. ● SFD (Display of shear Force Diagram, to be used after Analysis, Design and Quantity options have been successfully Run. ● Zoom (Display of part of Floor Plan under Selection). Now Click on " BMD " option. Following Graphics is displayed. |
 |
|
|
|
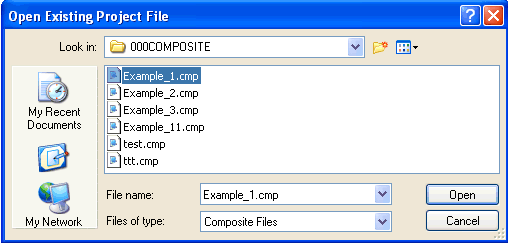
Now select " Example _1 File & Press Open Button. Following Warning is displayed. |
 |
|
|
|
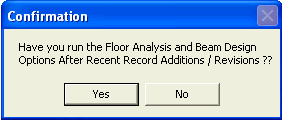
This is a very Important
Message. In case a user has edited or added any Joint / Column / Beam or Slab
Member after performing analysis then he should re-perform the analysis, else
old (in-correct) results will be displayed. The Beam Designs are
equally important as these options inform you about correctness of Beam
Design. Click " Yes " if you have not revised any member after analysis or click " No " if you are not sure. If " Yes " is clicked then following graphics will be displayed. |
 |
|
|
|
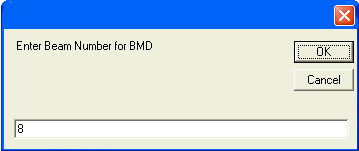
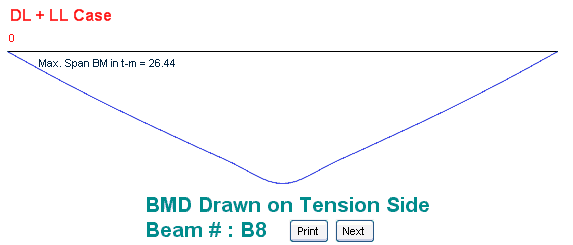
Type the Beam # whose BMD, you
would like to see. I want to see BMD for B8. Enter " 8 " & Click Ok. Following message is displayed. |
 |
|
|
|
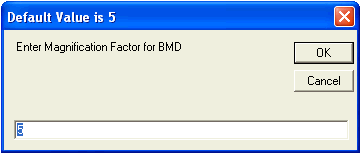
You are asked to specify
Magnification Factor (MF). You have to do trial & error to achieve the required
MF for appropriate display on computer screen. Keep the MF of 5. Click OK. Following BMD is displayed. |
 |
|
|
|
Note that BMD is drawn on
Tension Side which reflects
Deflected shape of Beam. BMD, SFD and Load Diagrams are Important from
the point of Checking Results & Data Input. Any un-expected Diagram will reflect
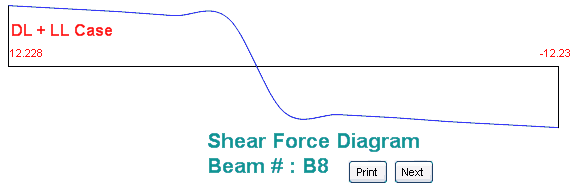
Data Error in the form of : ● Incorrect Geometry (Span, Grid Dimension). ● Incorrect Loads (Point Load, Slab Spanning). ● Floor Analysis and Beam Design not performed after Editing / Adding Geometry or Loads. Now Click on " SFD " option. The procedure is exactly same as that of BMD. SFD is displayed as under. MF = 5.0 |
 |
|
|
|
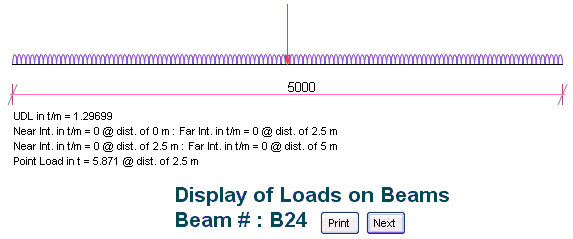
Now Click " Loads "
button. The procedure is exactly same as that of BMD / SFD. Load Diagram is displayed for Beam No. 24 as under. MF = 5 Near Intensity & Far Intensity = 0 means no direct Floor load on the beam. However Point Loads from secondary Beams are present. |
 |
|
|
|
The best way to check data entry is Load Diagram. Check that Loads are Correct in magnitude as well as in Location & Shape. Check the presence or absence of Point Load Reaction from Secondary beams. In the present case the reaction point load is from Beams B9, 10, 12 & B13. Check span with total of slab load distances. All distances are from LHS. |
|
|
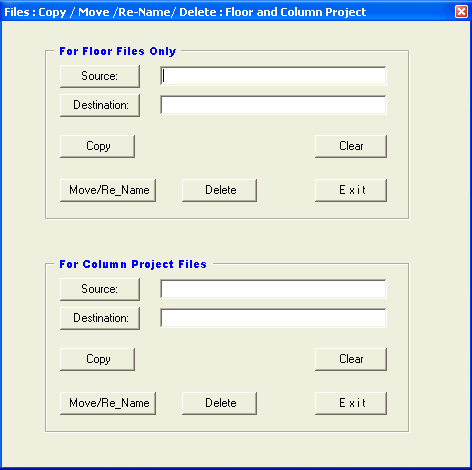
Now Click " Files " button at
the top. Following window is displayed. |
 |
|
|
|
Here we have 2 menus, one for
Floor file and another for Column Project File. Use " For Floor Files Only " option to Copy, Delete & Move / Re-Name Floor Files. Now we will copy Example_1 file to Example_2 file. Click " Source " Button & select Eample_1 File from the file Dialogue Box. Again Click " Destination " Button & select Eample_2 File from the file Dialogue Box. Click " Copy " button. Following Window is displayed. |
 |
|
|
|
Similarly we can use Delete
Option to Delete Files, however note that there will be no
" Destination " file & destination text box shall be empty. Note that Floor File extension is " .CMP ", while Column Project File Extension is " .DAT ". The Column-Foundation File menu is similar to Floor File Menu, only difference is File extension. Hence Use " For Column " option to Copy, Delete & Move / Re-Name Column and Foundation Files. Now we have come to the end of Step # 11. |
| STEP NO. 11 IS OVER. |
|
|
|
|